Flight Manual: Bookmark J 35J Draken 5.12024-04-04
Normal operating procedures
Before starting the engine
In the following screenshots the animated switch protector covers have been hidden. You can enable/disable this feature from the Options panel (F9).
-
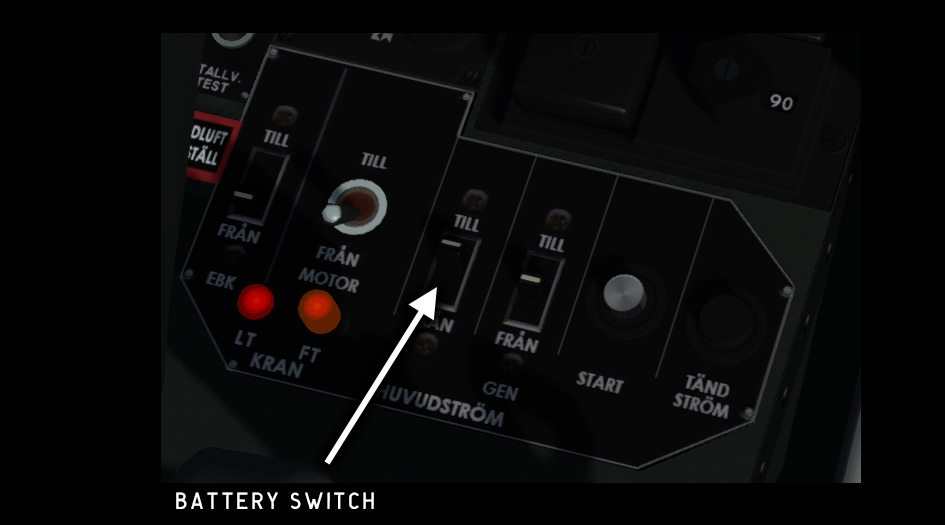
Switch on the main power (battery) switch.
This will connect the hot battery bus to the main 29 VDC bus.
-
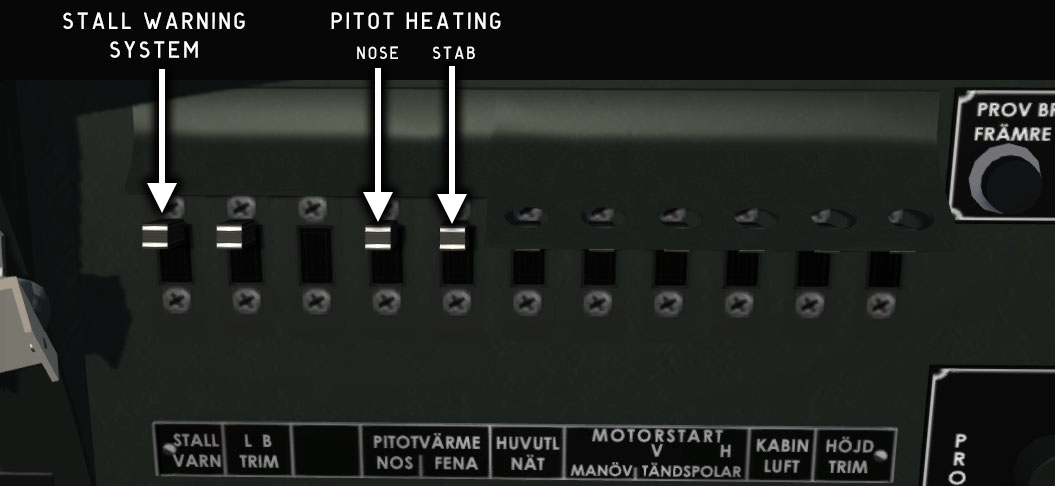
Switch all circuit breakers ON (up).
-
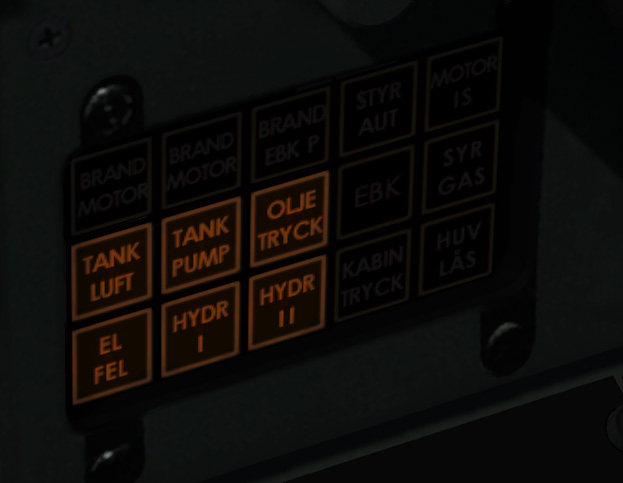
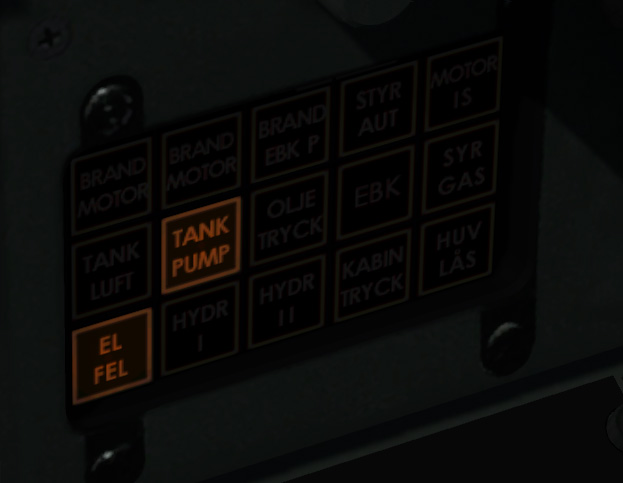
The master warning light and the following 6 warning lights will now be lit.
(see Systems for an explanation of all warning lights)
If HUVLÅS is also lit, close the canopy with Shift-E.
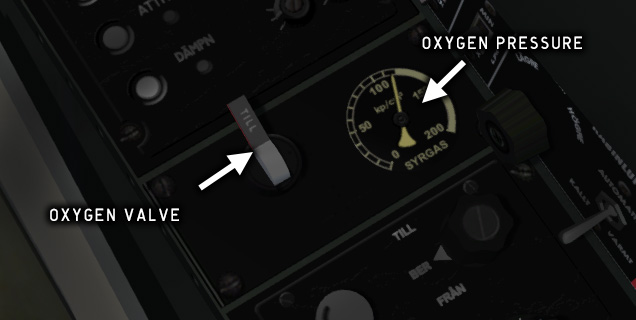
If SYRGAS is lit, open the oxygen valve.
-
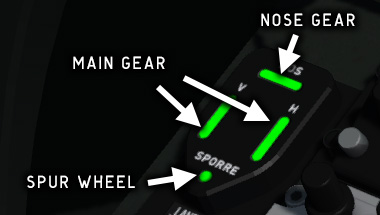
Check that the gear indicator shows 4 green lights.
The spur wheel light may be unlit until the engine is started.
-
Open the main and afterburner low pressure fuel valves (TILL).
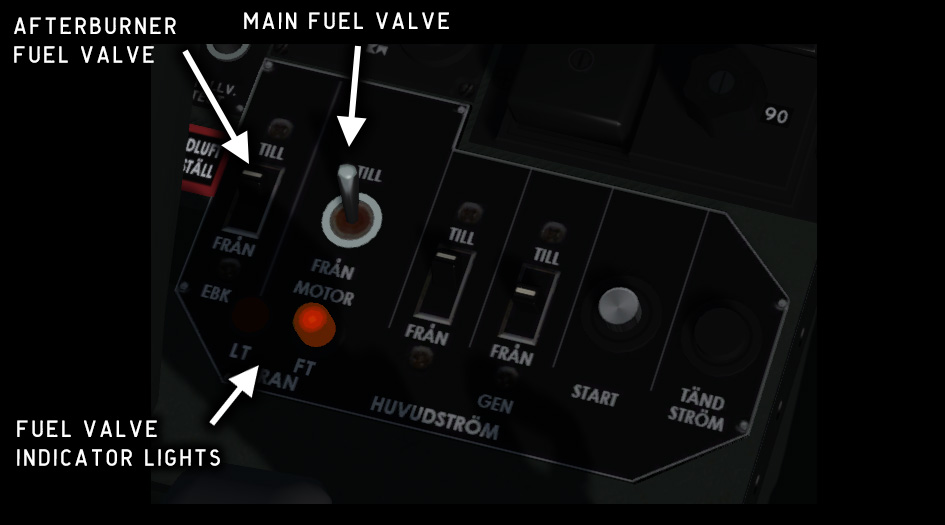
The low pressure fuel valve warning light LT should now be unlit.
The external tank fuel valve warning light FT should be lit if the aircraft is fitted with external tanks. If the external tanks are empty the light will be unlit.
The fuel level gauge is powered by the AC bus, which means that it will show zero until the engine is started.
-
If external tanks are fitted, open the external tank fuel valves (TILL).
Check that the FT warning light on the engine control panel is unlit.
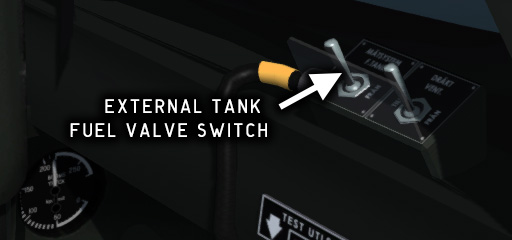
When fuel is supplied from the drop tanks, fuel pressure will be sufficient even without the fuel pump running. The TANKP warning light should therefore now be unlit.
The pre-starting procedure is now complete. Proceed to Starting the engine.
Starting the engine
-
Apply the parking brakes.
-
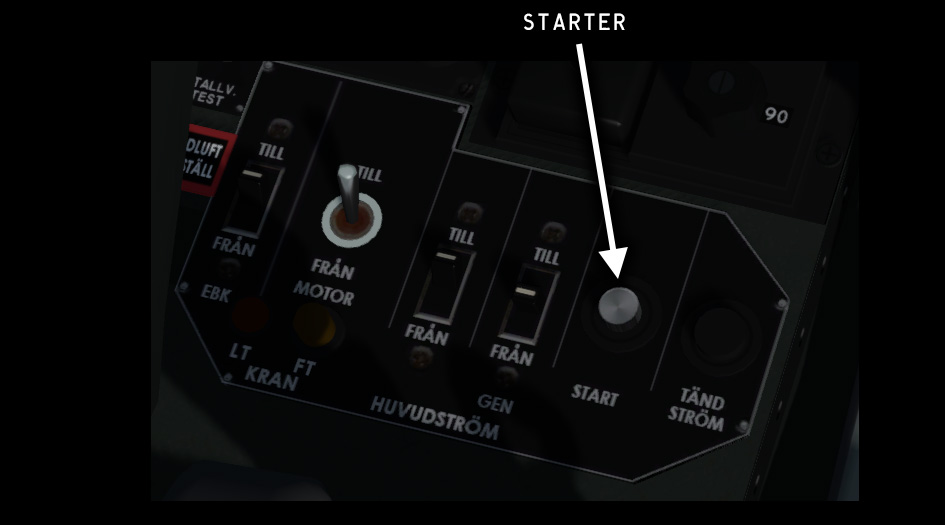
Press and hold the starter pushbutton. Release the starter as soon as the sound of the start pump (a high whining sound) is heard.
-
The oil pressure and hydraulic system warning lights on the main warning panel should go out as the engine spools up.
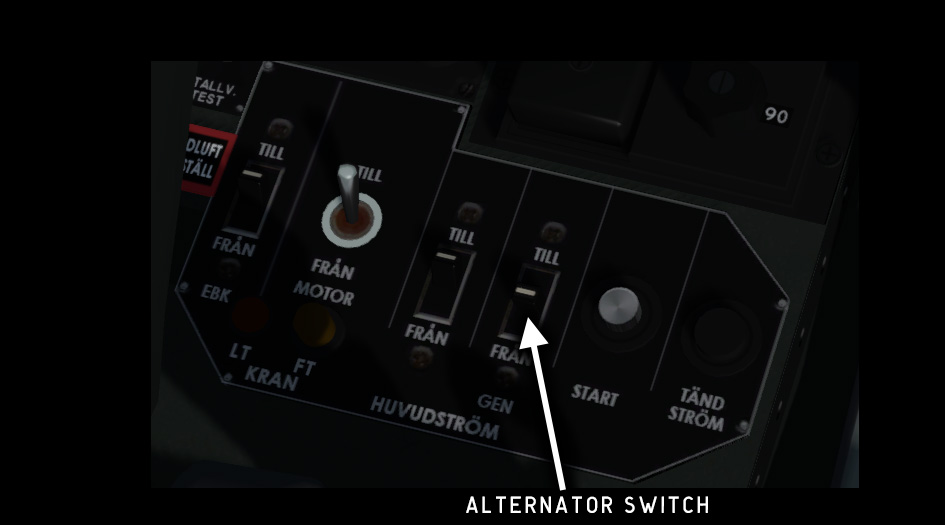
The electrical system warning light ELFEL will remain lit until the alternator is engaged.
The TANKPUMP warning light will also be lit if the exterior tank fuel valve is closed.
-
When engine speed is stable above 30 %, push the alternator switch upwards to engage the alternator on the main AC bus.
-
Open the oxygen valve. Check that the oxygen warning light SYRGAS goes out.
All warning lights on the warning lights panel as well as the master warning light on the front panel should now be unlit.
The engine startup procedure is now completed. Proceed to Taxi and takeoff.
Taxi and takeoff
-
Set communication radios and navigation systems as needed.
-
Set the transponder to ON.
-
Set the autopilot to DÄPMN (pitch damping, the default mode).
-
Check and set the altimeters as needed.
-
Release the parking brake and increase engine speed to about 60 %, then reduce throttle as soon as the aircraft starts moving. Use the tiller/pedals and wheel brakes to control the aircraft on the ground.
-
When lined up on the runway, apply the parking brake and center the nose wheel.
-
Move the stick to check control surface movement.
When the engine is idling, large stick movements may cause the HYDR II warning to light up. This is normal as the hydraulic pressure is low at this point.
-
Release the parking brake and hold the aircraft using the toe brakes.
-
Increase throttle to 70 % and check that the engine responds. Release the toe brakes and apply full throttle. Use afterburner as needed.
-
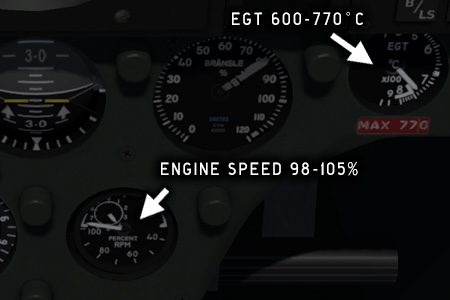
Check that engine speed is within 98–105 % and EGT within 600–750 °C.
-
Start rotation at 250 kmh (135 kts), lift off before 320 kmh (172 kts).
-
Retract gear before exceeding 400 kmh (215 kts).
-
Shut off the afterburner at 500 kmh (270 kts) unless you intend to climb on afterburner (see Climb).
Climb
Climb is normally carried out on full throttle with or without afterburner. Adjust the pitch as needed to control your climb speed.
|
Throttle setting |
Normal climb speed |
Attitude |
|---|---|---|
|
Full throttle without A/B |
0.9 M |
10–15° |
|
Full throttle with A/B |
850 kmh – 0.9 M |
~30° |
When climbing on afterburner, keep the angle of attack up to avoid overspeeding.
Zoom climb
Zoom climb is carried out by accelerating to very high speed in level flight, then using the kinetic energy to climb. In this way you can achieve a much higher climb rate than is possible in a sustained climb.
-
Make an initial climb to a suitable altitude and level off.
-
Accelerate on full throttle + afterburner, maintaining level flight.
Do not exceed VNE.
Reduce throttle if EGT exceeds 770°C.
-
Raise the nose smoothly to 30–45° attitude. The attitude angle depends on your speed: Higher Mach number = steeper attitude.
-
Level off smoothly at the desired altitude. Avoid negative G.
Minimum Vi at TOC = 300 kmh.
Cruise
Normal cruise speed = 0.9 Mach.
Supersonic speed can be attained at all altitudes up to about 13000 m (42000 ft).
VNE (never exceed speed) can easily be exceeded at low altitude.
Descent
Reduce throttle to ground idle (0% throttle, ~30% engine speed) for a standard descent. Optimal sink rate is achieved at 0.9 M to 550 kmh Vi descent speed.
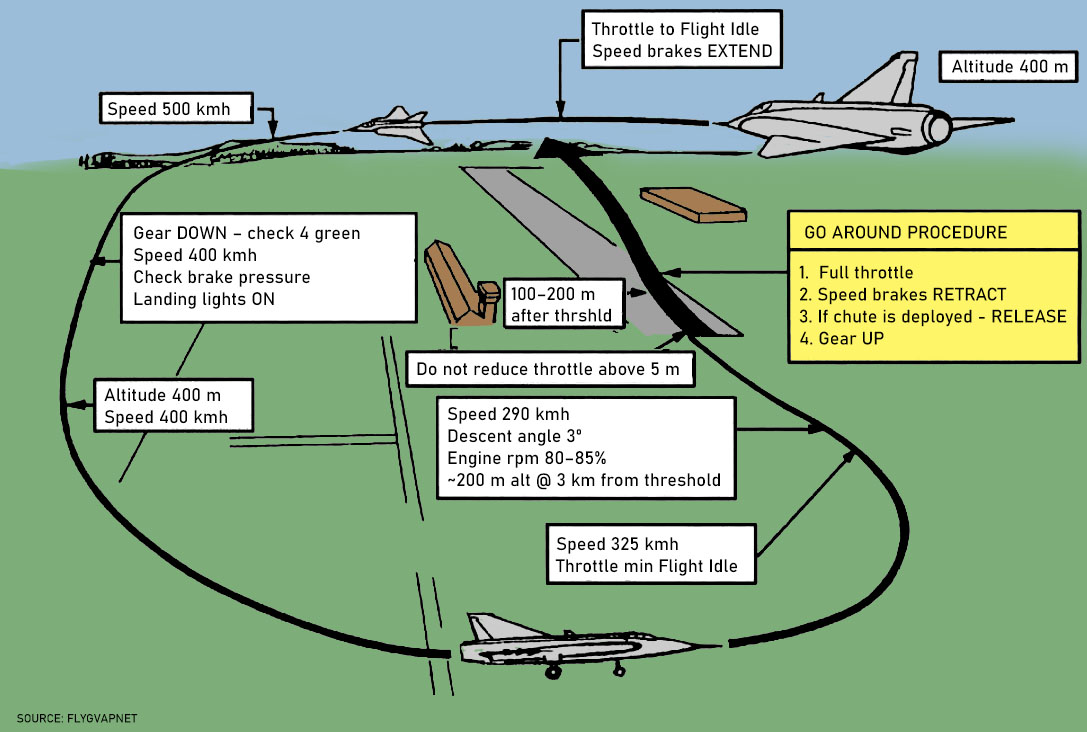
Final approach and landing
Apply speed brakes and decelerate to 500 kmh at 400 m altitude. Extend gear <500 kmh, increase throttle to counter for gear drag if necessary. Watch your speed and let it bleed off gradually to 400 kmh before the final turn, 325 kmh minimum when you exit the turn.
Ideal conditions would mean a long, straight final approach at 300–350 kmh and 12° AOA with gear down and speedbrakes deployed. Engine rpm should be 80–85 % depending on fuel weight.
Keep a constant check on your speed and alpha until you are safely on the runway. Touch down at 280 kmh minimum, 320 kmh if heavy. Do NOT flare, and do NOT cut the throttle before touch down!
After TD, keep the nose up for aerodynamic braking as long as possible, then add wheel brakes. Use the drag chute if you are heavy or on a short runway.
Be very careful when below 325 kmh airspeed at low altitude. If you pull up at this point you will reach stall conditions very quickly, with no chance of recovery. If you have doubts about your ability to make a safe landing – GO AROUND.
Go around procedure
-
Retract speed brakes
-
Apply full throttle, use afterburner if necessary
-
If drag chute is deployed, release it
-
Retract gear when aircraft is accelerating
Copyright © 2001–2024 Bookmark AB